Flying full approaches: The John Wayne ILS RWY 19R
Provides an overview how to fly full approaches, using the KSNA ILS RWY19R as an example. Covers the procedure from the SLI and POM feeder routes.
Note: The runways have been renumbered since this material was written, it is now the ILS RWY 20R approach. More importantly, POM VOR is no longer an IAF, so the section on flying it from POM is no longer relevant from an operational standpoint. However, the concepts remain sound, so the material is being left here for reference purposes.
The circumstances under which this situation occurs include:
- lack of ATC radar coverage due to terrain or equipment failure (not a factor on online networks)
- ATC not having a final approach course depicted on their scope for that particular approach. This usually happens at smaller fields or for non-precision approaches (eg. VOR or NDB approaches)
- pilot requests full approach for training purposes
- ATC just feeling busy, mean, lazy, or a horrifying combination of all three.
Print the ILS chart from the required materials section below, or have it open in another window to get the most value from this article.
Feed me now!
ATC can clear you for an approach if you are established on a route that will overfly an Initial Approach Fix (IAF). Many IFR flights take place within the low enroute structure on Victor airways. IAF's are most often not located on these airways, so the question becomes, in absence of being vectored to the IAF, how do you safely transition from airways to the IAF?
Specially charted routes called 'feeders' have been developed for precisely this case. They lead from the enroute structure to an IAF, providing terrain separation and navigation reception, much like an airway, except considerably shorter. They are found on instrument approach charts, such as our ILS RWY 19R chart for KSNA.
SLI is a feeder on our approach plate. This means that if your route of flight (either what you originally filed, or as a result of a route ammendement in the air) has you going to either of these 3 places, ATC can say "cross SLI at or above xxxx, cleared approach", and you're on your own.
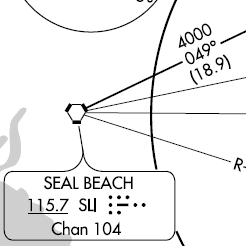 How do we KNOW that SLI is a feeder? It has a route segment length and minimum enroute altitude depicted. For SLI, it's 18.9nm at or above 4000ft to SAGER.
Notice the medium thickness of the line associated with feeder routes compared to the thin lines associated with the radials used to simply identify a fix, such as the SLI R-063 to identify SNAKE, or SLI R-075 to identify LEMON. Do not confuse those with feeder routes. Other than the thin line, there's also no associated altitude, or route segment length, so that rules them out immediately.
Ok, so whether we were cleared from SLI, we now find ourselves approaching SAGER, the IAF. Now what?
Course reversal? You gotta know when to hold 'em.
Instrument approaches often call for a course reversal, either via a procedure turn, or a hold in lieu of a procedure turn. Procedure turns won't be covered in detail here since the ILS RWY 19R specifically calls for a hold in lieu of a procedure turn, so we must fly the hold entry instead. If a course reversal is depicted, it MUST be flown, UNLESS:- you are receiving vectors to the final approach course, OR
- the feeder route on specifically says NoPT
The route from POM (also an IAF) has a NoPT depiction, so a reversal is not required. Coming from SLI, we're not so lucky, and a reversal is required. This should come as no surprise, though. The purpose of the course reversal (be it a hold, or a procedure turn) is to align the aircraft with the approach and/or to descend an aircraft down to a more reasonable altitude for the approach while remaining clear of terrain. The line from POM to SAGER is within 50 degrees of the approach course, and already has you at the same altitude as the hold, so the hold would add little value, hence, NoPT.
How to fly the approach from SLI
Ok, we've talked in high level terms about how to read the chart, and when we do or do not need to fly a course reversal. Let's deal with the specifics of how to efficiently fly this approach. Let's assume we're direct SLI, approaching from the west and we receive our approach clearance, "cross SLI at or above 4000, cleared ILS rwy 19R approach, report SAGER inbound."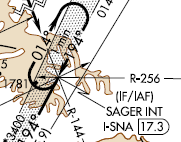 Departing SLI, we fly heading 049 (as depicted on the chart), tracking towards SAGER. Thinking ahead, we see we'll need to join the I-SNA localizer outbound, so on the other NAV radio, we set the freq to 111.75. Over SAGER, we make a left turn to hdg 014 and join the localizer outbound.
From here, we fly the hold entry to become established on the final approach course. We can descend to 3500 in the hold entry, as depicted on the bottom of the chart.
From our location, this will be a parallel hold entry, so we continue outbound on the localizer for 1 minute past SAGER, then initiate a left 225 degree turn (180 + 45) then join the localizer inbound again. We're now coming up on SAGER, inbound, and we've flown the hold entry. Notice we haven't flown a full lap of the hold. It is not required, as the goal of this procedure is to have us become established on the final approach course, which we have now done. See the I-6 video (bottom of page) for a visual depiction of how to fly the hold.
Quick aside, you might wonder why the depicted hold at SAGER shows RIGHT turns, whereas we primarily made left turns during the course of the parallel hold entry. This is because the hold serves two different purposes:
1) it is a "hold in lieu of a procedure turn", which facilitates the course reversal necessary to complete the procedure when arriving over SAGER from awkward angles (such as SLI R-049).
2) it serves as a holding point if ATC needs to essentially park airplanes over SAGER as they await their turn for the approach. This would typically only be done in a non-radar environment. Since KSNA is a radar facility, they can have multiple aircraft conducting the approach at the same time, so this point is somewhat academic at KSNA in terms of daily operations.
The course that is depicted is for the full holding pattern (case #2). In our case, we used it for case #1, just to turn the boat around. When we finish the course reversal, we're approaching SAGER, inbound. A full lap of the hold from that point would add precisely 0 value. It would have us arriving, 4 minutes later, over the same point, at the same altitude.
We report to ATC, "SAGER, inbound." (Feel free to skip the next section regarding POM, move straight to the 'Flying the approach from SAGER, inbound'.
How to fly the approach from POM
The procedure is certainly flyable from SLI, but it is also flyable starting from POM, too. If we were indeed coming from POM, we would cross POM and then initiate a descent to 3500 to join the POM R-144 outbound. Our other NAV radio will be set up to receive the localizer, allowing us to join the final approach course at SAGER. Crossing SAGER, we descend to 3400 and join the localizer inbound with a right turn to a course of 194. We would not fly the depicted hold, as the segment from POM has a 'No PT' depiction. In any case, we're now at SAGER, ready to continue...Flying the approach from SAGER, inbound
Whether we started at POM, or SLI, we're now at SAGER, and it's time to continue on the localizer towards SNAKE. At SNAKE, we intercept the glideslope and begin our descent. The lightning bolt depicts the glideslope intercept altitude. Crossing the outer marker at 2202', we continue inbound on the glideslope, descending as low as 255'. Reaching 255', the decision height for this precision approach, we must either have the runway environment in sight, or execute the missed approach procedure. If we were unable to receive the glideslope, or if it was out of service, we would execute a localizer only approach from SAGER, cross SNAKE at or above 3400, LEMON at or above 2300, DYERS (I-SNA 4.1 DME) at or above 1044 and then maintain 440' until the middle marker, at which point we either land with the runway in sight, or execute the missed approach.
| Required Materials |
| KSNA ILS 19R approach chart
John Wayne ILS rwy 19R approach chart
|
| Related Materials |
| KLAX-KSNA Instructional Video
Flying LAX's SLI5 departure and the KSNA ILS 19R full approach without vectors
|